Why Stick-On Drawer Organizer?
- Quick and Easy – install right in your home with minimal tools in just minutes
- Removeable without damaging drawers
- Easy to reconfigure
- Cheap – about $5 for this drawer as shown
- Works with almost any drawer, including metal sides
What You’ll Need
- 3/8″ or 1/2″ Plastic C Channel (available from Amazon here) – match board thickness
- 3/8″ or 1/2″ thick wood pieces, 2-1/2″ width most popular but can do other widths for deeper or shallower dividers (available at Lowes nor Mendards) – match c-channel thickness
- Mounting tape, 1/2″ width, I used this one
- Pruning Shears or Heavy Duty Scissors
- Measuring Tape
- Jigsaw or other saw for cutting wood to lengths
More About Choosing Wood
3/8″ wood is what is shown in the photos and videos. I have also done 1/2″. Both work just fine, really will depend on what wood is available to you.
The depth shown in these photos and video is 1-1/2″ (may be referred to as 2″ when buying but it is actual dimension of 1-1/2″). I like this shallow depth because it is easy to reach in small spaces if the depth is short. Avoid tall, narrow dividers that are hard to reach in.
For wood species, I used pine. There are other options, even softer wood like balsa, or more expensive hardwoods. All work just fine. You could even use hardwood plywood that is ripped into strips.
How Much Material Do I Need?
For my one drawer shown, I used right at 1 foot of c-channel and about 2 linear feet of wood board. My advice would be to purchase the pack of c-channel from Amazon, and then just cut and use it up as you go around the house, you’ll be wanting to tackle all your drawers!
Planning?
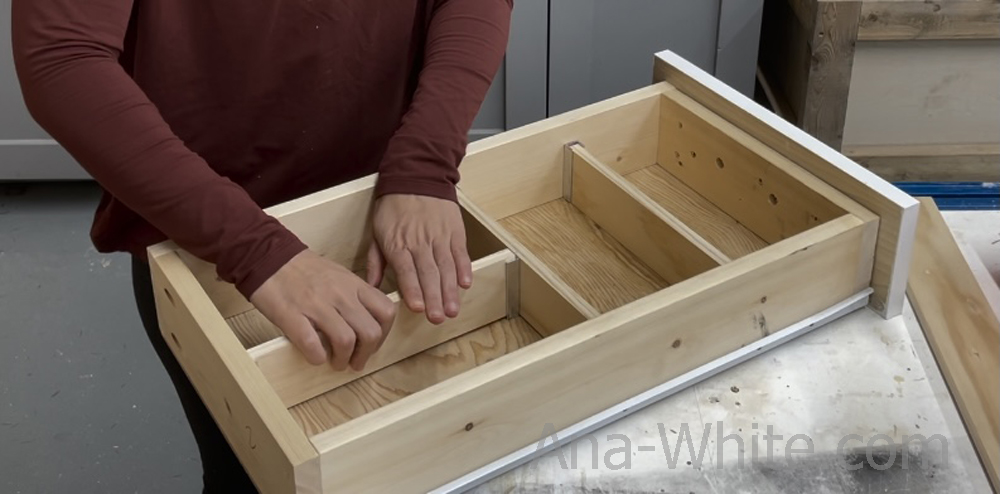
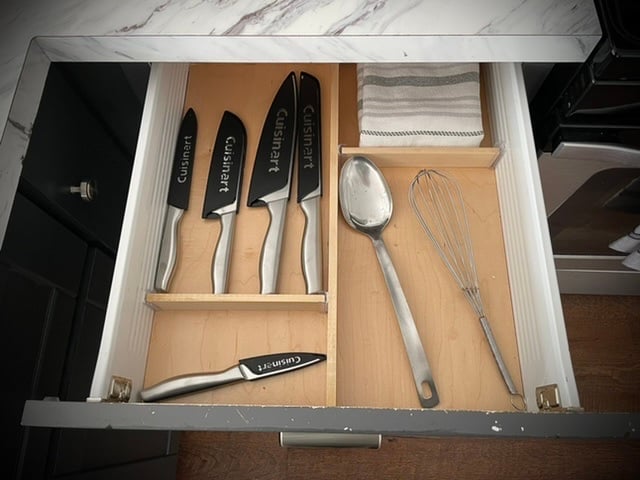
This method is SO simple, I really liked just creating the dividers right in place, so I could section the drawer off with the contents available to measure and fit. This is the beauty of this method – just open a drawer, add a divider, and keep adding dividers until you are satisfied. And if you mess up, just unstick and restick it.
How to Make Your Own Stick On Drawer Dividers
Clear out the drawer and clean it well. The sides need to be cleaned so the mounting tape will stick.
Measure and mark where the first divider is to be placed.

Cut the C-channel with pruning shears or heavy duty scissors. The cut length should match the board width – in my example, I used 1-1/2″ wide boards, so I cut my c-channel pieces 1-1/2″ long. You’ll need two c-channel pieces per divider.
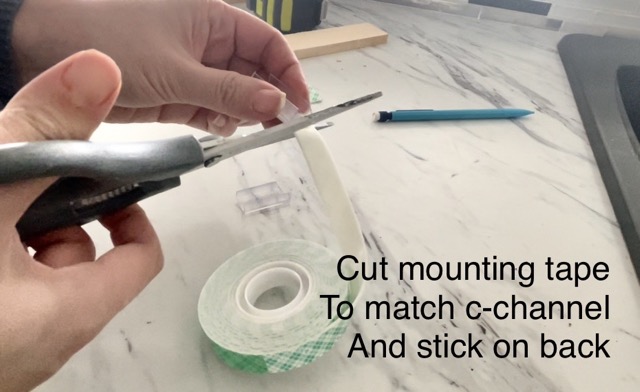
Cut the mounting tape to fit the backs of the channel and stick to backs.
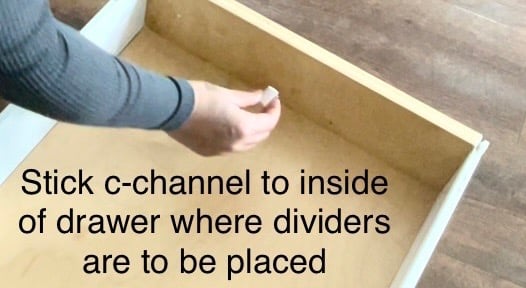
Stick the c-channel pieces inside the drawer. TIP: I measure out and marked the centers, making sure the mark would be visible when sticking the c-channel in place.
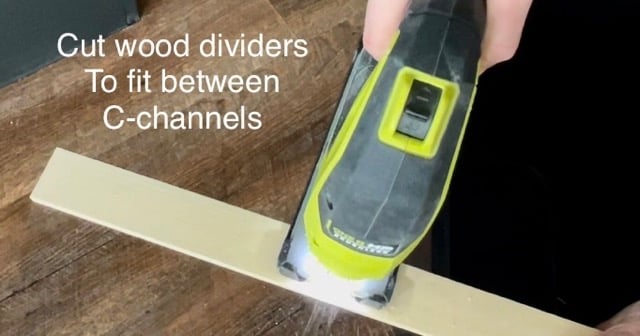
Measure inside the c-channel and cut wood pieces to fit, so the pieces fit snug but not too tight. I used a jigsaw to cut.
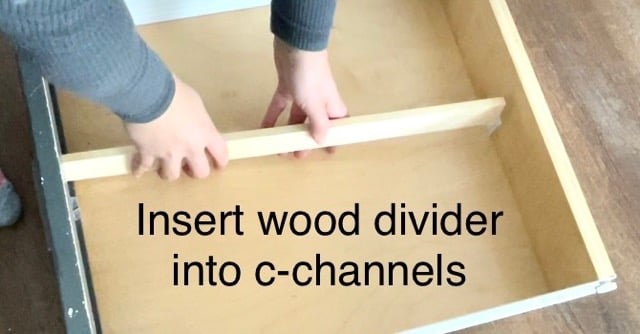
Insert the cut wood piece into the c-channels.
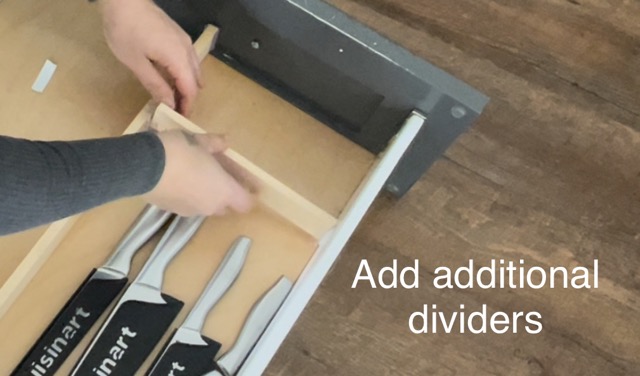
Repeat as desired – the more dividers you add in, the more stable the system will be.
Quick Video of Stick-On Drawer Organizers
Here’s a 30 second video of my tackling a drawer. I do recommend the pruning shears instead of the scissors for cutting the c-channel, this was a much cleaner method of cutting it.
FAQ About Stick On Drawer Organizers
- What else can I use in place of the C Channel? Metal c channel, PVC shelf edging moulding or u channel are all options. Also, if you have a 3D printer, you can print your own.
- Should I pre-finish the wood pieces? If in the kitchen or bathroom, I would. A quick clear poly would be sufficient.
- Can I attach to the bottom? You may wish to, especially on longer spans. Just add mounting tape to the bottom of the board when you slide it into the c-channel
- My plastic pieces are sharp. What can I do? Try cutting the plastic pieces a little short. You can also trim sharp edges off with scissors.
See Also: Metal C-Channel Drawer Organizers
This idea was built off my original metal C-Channel drawer organizer tutorial. The metal channel is harder to do, as you have to file down the metal pieces so there’s no sharp edges, but it does produce a nice finished product.